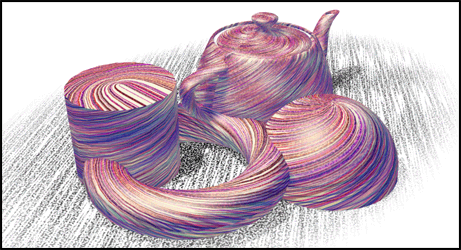
Pencil+ 4 Stroke
Pencil+ 4 Strokes are maps that make it possible to create strokes similar to hand-drawn ones, as well as hatchings.
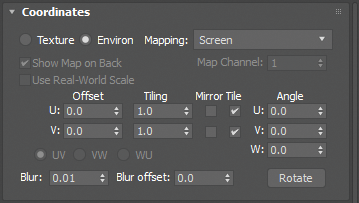
Coordinates
Set the Pencil+ 4 Stroke coordinates. The parameters behave in the same way as 3ds Max [Coordinates].
Coordinates
Pencil+ 4 Stroke coordinates.
Texture
Applies the map as a texture to a surface. Select the type of coordinates from the [Mapping] list.
Environ
Uses the map as an Environment map. Select the type of coordinates from the [Mapping] list.
Mapping Type
The available options vary depending on whether a [Texture] mapping or an [Environment] mapping is selected.
Explicit Map Channel
Uses any map channel. When selected, the Map Channel field becomes active, and you can choose any channel from 1 to 99.
Vertex Color Channel
Uses assigned vertex colors as a channel.
Planar from Object XYZ
Uses planar mapping based on the object's local coordinates (disregarding the pivot point location). For rendering purposes, planar mapping doesn't project through to the back of the object unless you turn on Show Map On Back.
Planar from World XYZ
Uses planar mapping based on the scene’s world coordinates (disregarding the object’s bounding box). For rendering purposes, planar mapping doesn't project through to the back of the object unless you turn on Show Map On Back.
[Spherical Environment] [Cylindrical Environment] [Shrink-wrap Environment]
Projects the map into the scene as though it were mapped to an invisible object in the background.
Screen
Projects as a flat backdrop in the scene.
Show Map on Back
When on, planar mapping (Planar from Object XYZ, or with the UVW Map modifier) projects through to render on the back of the object. When off, planar mapping doesn't render on the object's back. Default=on.
This toggle is available only when Tiling is off in both dimensions. Its effect is visible only when you render the scene.
Offset
Changes the position of the map in UV coordinates. The map moves in relation to its size. For example, if you want to shift the map its full width to the left, and half its width downward from its original position, you enter -1 in the U Offset field and 0.5 in the V offset field.
[UV] [VW] [WU]
Changes the mapping coordinate system used for the map. The default UV coordinates project the map onto the surface like a slide projector. The VW and WU coordinates rotate the map so that it is perpendicular to the surface.
Tiling
Determines the number of times the map is repeated along each axis when Tile or Mirror is on.
Mirror
Repeats and reflects the map left-to-right (U axis) and/or top-to-bottom (V axis).
Tile
Toggles repetition, but not reflection, of the map left-to-right (U axis) and/or top-to-bottom (V axis).
Angles [U] [V] [W]
Rotates the map about the U, V, or W axis (in degrees).
Rotate
Displays a schematic Rotate Mapping Coordinates dialog that lets you rotate the map by dragging on an arcball diagram (similar to the arcball used to rotate viewports, although dragging inside the circle rotates along all three axes, and dragging outside it rotates about the W axis only). The Angle UVW values change as you drag in the dialog.
Blur
Pencil+ 4 Stroke does not support this parameter.
Blur Offset
Pencil+ 4 Stroke does not support this parameter.
Noise
Settings for adding noise to Pencil+ 4 Strokes
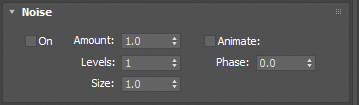
Noise
Add random noise to the stroke. The parameters behave in the same way as those of 3ds Max.
On
Determines whether the Noise parameters affect the [Stroke].
Amount
Sets the strength of the fractal function, expressed as a percentage. If the amount is 0 there is no noise. If the amount is 100 the map becomes pure noise. Default=1.0.
Levels
Or iterations: The number of times the function is applied. The effect of the level is dependent on the Amount value. The stronger the amount, the greater the effect of increasing the Levels value. Range=1 to 10; Default=1.
Size
Sets the scale of the noise function relative to geometry. At very small values, the noise effect becomes white noise. At large values, the scale can exceed the scale of the geometry, in which case it has little or no effect. Range=0.001 to 100; Default=1.0.
Animate
Determines whether animation is on the noise effect. This parameter must be turned on if you intend to animate the noise.
Phase
Controls the speed of the animation of the noise function.
Coordinates Extension
Extend coordinates in this section.
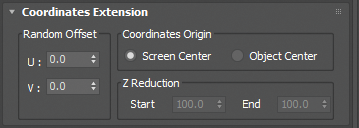
Coordinates Extension
Coordinates extension settings.
Random Offset U/V
Randomize stroke offset. This value is used for [Stroke Animation]. A bigger value has a stronger impact on the stroke animation.
Coordinates Origin
Adjust the coordinates used by strokes. This parameter is active when [Environment] is selected in the [Coordinates] rollout.
Screen Center
Stroke drawing uses the screen as reference.
Object Center
Stroke drawing uses the object's origin as reference.
 |
 |
| Screen Center | Object Center |
Z Reduction
Active when [Coordinates Origin] is set to [Object Center]. Makes it possible to reduce the size of the strokes based on the distance to the camera.
Start
Define the starting point (Z-value) for stroke reduction.
End
Defines the end point (Z-value) for stroke reduction.
Stroke
Define the Stroke settings.
Presets
Define Stroke Presets.
Presets
Load previously saved parameter settings. All the settings are saved.
Presets are saved to the following file:
Windows 7 and up:
C:\Users\Public\Documents\PSOFT\Pencil+ 4 for 3ds Max\Presets\pencil+4_preset_stroke.txt
Add
Save the current settings to Presets. Click [Add] after typing the presets name in the text entry field.
Warning
The Map settings are not saved to Presets.
Delete
Delete the current Presets. Click [Delete] after selecting the Presets you wish to delete in the drop-down list.
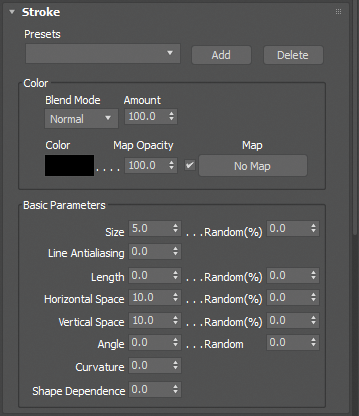
Color
Define how colors are applied to strokes.
Blend Mode
Select the method used to blend strokes.
Warning
This feature only applies to Strokes that are included in a Pencil+ 4 Material Stroke List.
Blend Amount
Adjust the blending intensity.
Color
Select the base color applied to the stroke.
Map Opacity
Adjust the opacity of the map. A lower value makes the map more transparent.
Map
Apply a map to the stroke color.
Basic Parameters
Basic parameters of the strokes. When [Stroke Animation] is enabled, the random seeds for all parameters' [Random] values change according to the value of [Interval].
Size
Adjust stroke thickness.
Line Antialiasing
Adjust the intensity of the anti-aliasing applied to the stroke lines.
Length
Adjust stroke length.
Horizontal Space
Adjust the horizontal space between strokes.
Vertical Space
Adjust the vertical space between strokes.
Angle
Adjust the angle of strokes.
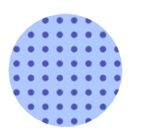
Curvature
Adjust the curvature of complete strokes.
 |
| Stroke using Curvature |
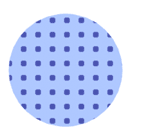
Shape Dependence
Modify the curvature of the strokes based on the shape of the object to which the material is applied.
 |
| Stroke using Shape Dependence |
Size Reduction
Define stroke size reduction settings.
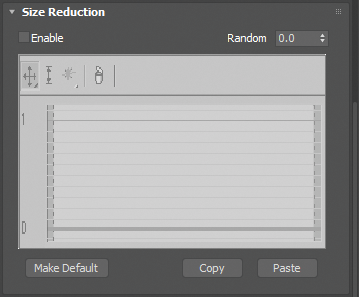
Size Reduction
Apply size reduction to individual stroke thickness.
Enable
Enable / disable the size reduction effect.
Random
Randomize the stroke size.
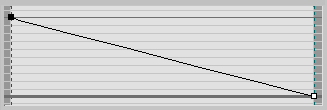
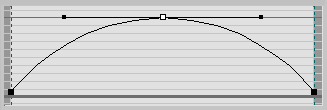
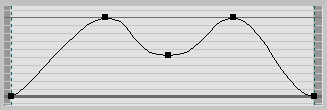
Curve
Modify stroke size based on the specified curve.
 |
 |
|---|---|
| Stroke size reduction is Off | Rendered image |
 |
 |
|---|---|
| Using a straight line for the curve | Rendered image |
 |
 |
|---|---|
| Using an arch-shaped curve | Rendered image |
 |
 |
|---|---|
| Using a ripple-shaped curve | Rendered image |
Make Default, Copy and Paste
Set stroke size reduction defaults and copy-paste the curve here.
Make Default
Make the current settings the initial default values. The default values are used when adding a new Pencil+ 4 Stroke.
The settings file is saved in the following location. To restore factory default values, delete the file "pencil+4_stroke.ini" and restart 3ds Max.
Windows 7 and up:
C:\Users\Public\Documents\PSOFT\Pencil+ 4 for 3ds Max\Configs\pencil+4_stroke.ini
Copy / Paste
Copy / Paste the parameters of the stroke size reduction area. Use this to copy the values to another stroke size reduction area.
Alpha Reduction
Define stroke alpha reduction settings.
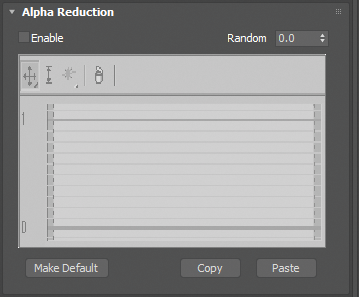
Alpha Reduction
Apply opacity reduction to individual strokes.
Enable
Enable / disable the stroke alpha reduction effect.
Random
Randomize the stroke opacity.
Curve
Modify stroke opacity based on the specified curve.
|
|
|---|---|
| Stroke alpha reduction is Off | Rendered image |
|
 |
|---|---|
| Using a straight line for the curve | Rendered image |
|
 |
|---|---|
| Using an arch-shaped curve | Rendered image |
|
 |
|---|---|
| Using a ripple-shaped curve | Rendered image |
Make Default, Copy and Paste
Set stroke alpha reduction defaults and copy-paste the curve here.
Make Default
Make the current settings the initial default values. The default values are used when adding a new Pencil+ 4 Stroke.
The settings file is saved in the following location. To restore factory default values, delete the file "pencil+4_stroke.ini" and restart 3ds Max.
Windows 7 and up
C:\Users\Public\Documents\PSOFT\Pencil+ 4 for 3ds Max\Configs\pencil+4_stroke.ini
Copy / Paste
Copy / Paste the parameters of the stroke alpha reduction area. Use this to copy the values to another stroke alpha reduction area.
Color Range
Use this section to make the color of the strokes variable.
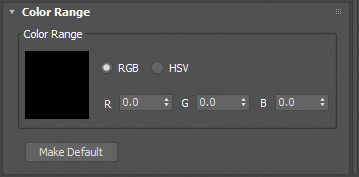
Color Range
This section contains color range settings. Apply color changes to single strokes based on the [Color] parameter in Brush Settings.
RGB
Specify the range of color variation using the "RGB" (Red, Green and Blue) color space.
HSV
Specify the range of color variation using the "HSV" (Hue, Saturation, Value) color space.
 |
| Using Color Range |
Make Default
Set color range defaults.
Make Default
Make the current settings the initial default values. The default values are used when adding a new Pencil+ 4 Stroke.
The settings file is saved in the following location. To restore factory default values, delete the file "pencil+4_stroke.ini" and restart 3ds Max.
Windows 7 and up
C:\Users\Public\Documents\PSOFT\Pencil+ 4 for 3ds Max\Configs\pencil+4_stroke.ini