Advanced Settings
Advanced Settings are an extension of Pencil+ 4 Material. They make it possible to define an even more detailed feel.
Advanced Settings
Set the material's advanced settings.
Gradation Offset Map
Add Offset effects to Gradation computation based on a map. Can make it easier for dark or light colors in a Gradation to come out. Unlike setting a map to a Zone, it produces natural looking gradations influenced by the light.
Enable
Enable / disable the Gradation Offset Map.
Amount
Adjust the intensity of the Gradation Offset Map.
Map
Set a map applied to the Gradation Offset.
 |
 |
 |
 |
 |
 |
|---|---|---|---|---|---|
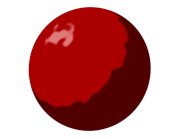
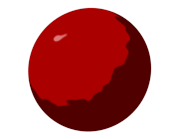
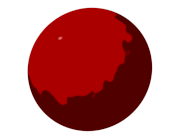
| Amount : 0 (Using a noise map) |
Amount : 20 | Amount : 40 | Amount : 60 | Amount : 80 | Amount : 100 |
Output Offset
Define the position to be used as the origin for the map output.
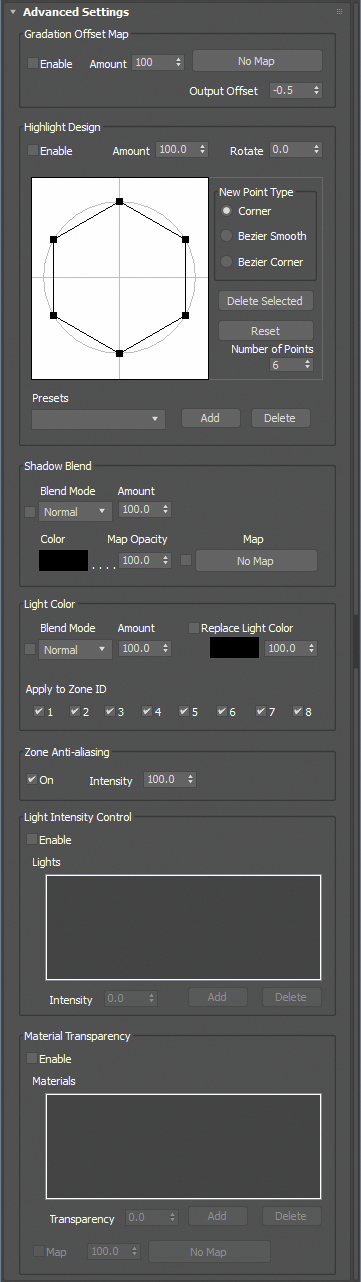
Highlight Design
Change the shape of the highlights to any shape desired using the graph. Efficient for creating simple shapes.
Enable
Enable / disable Highlight Design.
Amount
Adjust the intensity of the effect defined with the Highlight Editor.
Rotation
Specify the angle of the shape defined with the Highlight Editor.
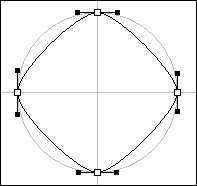
Highlight Editor
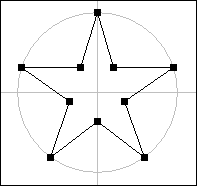
Define the shape of the highlights. You can use [Corner], [Bezier Smooth] or [Bezier corner].
Double-click in the [Highlight Editor] to add [Control Points].
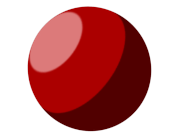
 |
 |
|---|---|
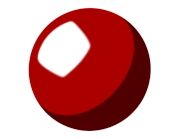
| Using a star shape | |
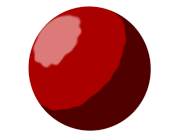
 |
 |
|---|---|
| Using a square | |
New Point Type
Define the type of newly created control points.
Delete Selected
Delete the selected control points.
Reset
Rearrange the graph using the number of control points defined by [Number of Points].
Number of Points
Define the number of control points used to create the initial configuration when [Reset] is clicked.
Presets
Handles preset functionality.
Highlight Design Presets
Load previously saved parameter settings. The shape in the Highlight Editor is saved.
Presets are saved to the following file:
Windows 7 and up:
C:\Users\Public\Documents\PSOFT\Pencil+ 4 for 3ds Max\Presets\pencil+4_preset_hidesign.txt
Add
Save the current settings to Presets. Click [Add] after typing the presets name in the text entry field.
Delete
Delete the current Presets. Click [Delete] after selecting the Presets you wish to delete in the drop-down list.
Shadow Blend
Define how shadows are blended. Set the [Shadow] color and how it is blended. Makes it possible to alter the color of the shadows falling on Pencil+ 4 Materials when [Shadow] is turned on in the Light settings.
Shadow Blend
Enable / disable the shadow blend effect.
Blend Mode
Select the shadow blending method.
Amount
Adjust the intensity of the blending.
Color
Set the color of the shadows.
 |
 |
|---|---|
| Shadow Blend Off | Shadow Blend On (Color set to blue) |
Map Opacity
Adjust the opacity of the map.
Enable
Enable / disable the map.
Map
Apply a map to the shadows.
Light Color
Define a [Light Color] affecting Gradations. Efficient when used for scenes where there are variations in the light source.
Light Color
Enable / disable the Light Color effect.
|
 |
 |
|---|---|---|
| Light Color Off | Light Color On (Yellow Light Color) |
Light Color On (Yellow Light Color, blue ambient light) |
Blend Mode
Select the light color blending method.
Amount
Adjust the intensity of the blending.
Replace Light Color
Enable / disable the light color replacement effect. Ignore the light color used in the scene and replace it with the specified color.
Color
Select the base color used for Replace Light Color.
Amount
Adjust the intensity of the Replace Light Color effect. If a small value is used, the color returns to what it was before replacement.
Apply to Zone ID
Specify the Zone IDs to which the Light Color effect should be applied.
|
 |
|---|---|
| All Zone IDs are Off | Only Zone IDs 3 and 4 are On |
Zone Anti-aliasing
Apply anti-aliasing effects to Zone boundaries.
By default, [Super Sampling] is off in 3ds max, so aliasing can appear depending on the lighting and shapes of the objects. This feature applies an effect similar to anti-aliasing to materials without using [Super Sampling]. For the best rendering results, you should turn off [Zone Anti-aliasing] and turn on [Super Sampling].
Under the following conditions, you can disable zone and highlight anti-aliasing by turning off [Zone Anti-aliasing].
- The [Min] and [Max] values of adjoining Zones overlap completely.
- The Highlight [Sharpness] is 100.
On
Enable / disable Zone Anti-aliasing.
Intensity
Adjust the intensity of the anti-aliasing effect.
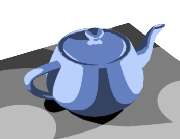
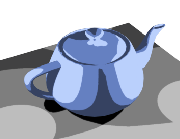
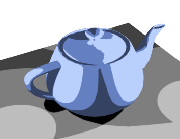
Light Intensity Control
You can adjust the light intensity for specific materials with this section.
Enable
Enable / disable Light Intensity Control.
Lights List
List of the lights where Light Intensity Control is applied. By selecting lights, you can adjust the [Intensity] for specific lights.
Intensity
Adjust light intensity. A value of 0 disables the influence of the light.
 |
 |
 |
 |
 |
 |
|---|---|---|---|---|---|
| Intensity: 0 (Changing the intensity of the light to the right with the blue material) |
Intensity: 50 | Intensity: 100 | Intensity: 150 | Intensity: 200 | Intensity: 250 |
Add
Open the [Add Objects] dialog. Select lights in the [Add Objects] dialog and click [Add] to register the lights to the Lights List.
Delete
Open the [Delete Objects] dialog. Select lights in the [Delete Objects] dialog and click [Delete] to delete the lights from the Lights List.
Material Transparency
You can adjust the penetration of materials in this section. This functionality allows a material to penetrate objects in front of it to be rendered in the foreground.
Enable
Enable / disable material penetration.
Materials List
List of the materials where material penetration is applied. By selecting materials, you can adjust material penetration for specific materials.
Transparency
Adjust material penetration. Setting it to 0 disables penetration.
| Transparency : 0 (Adding penetration to the blue material) |
Transparency : 20 | Transparency : 40 | Transparency : 60 | Transparency : 80 | Transparency : 100 |
Add
Open the [Add Material] dialog. Select materials in the [Add Material] dialog and click [OK] to register the materials to the Materials List.
Delete
Open the [Delete Material] dialog. Select materials in the [Delete Material] dialog and click [OK] to delete the materials from the Materials List.
Map
Enable / disable the map.
Map Opacity
Adjust the opacity of the map.
| Map Opacity : 0 (Using a checkered map) |
Map Opacity : 20 | Map Opacity : 40 | Map Opacity : 60 | Map Opacity : 80 | Map Opacity : 100 |