3. Configuration Window
Double-click the PSOFT Network License Manager icon on the desktop to open the Configuration window.
![]()
3-1. Licenses Tab
Use this tab to add, authorize, reset licenses, etc.
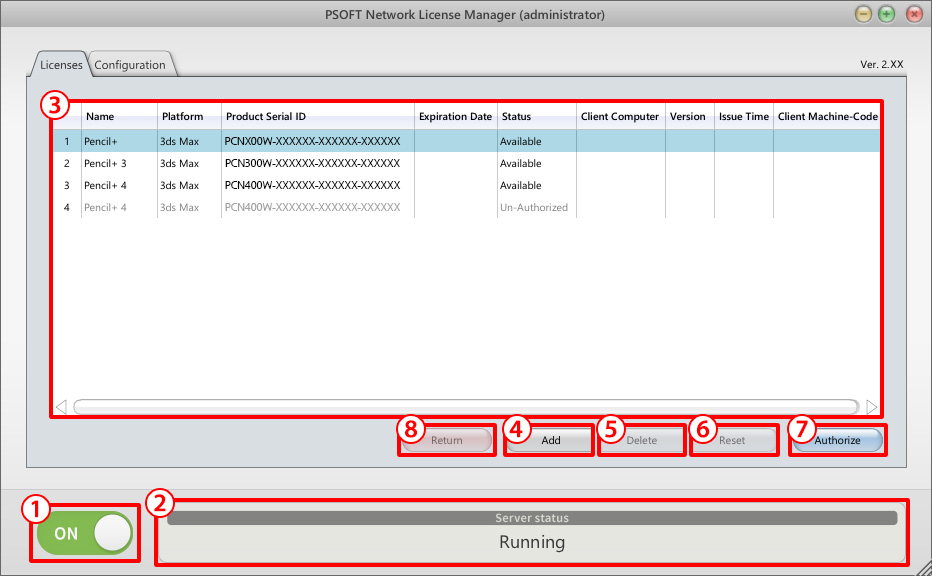
- ON / OFF button: Starts / stops the server.
- Server status: Displays the current status of the server.
-
Licenses overview: Displays an overview of the licenses and their statuses.
Status Value State Reserved License cannot be used (already in use). Available License can be used. Un-Authorized License was not authorized yet. -
Add button: Adds a license. (Opens a dialog window.)
- Delete button: Deletes a license. (Opens a dialog window.)
- Reset button: Resets a license. (Opens a dialog window.)
- Authorize button: Authorizes a license. (Opens a dialog window.)
- Return button: Returns a license. (Opens a dialog window.)
3-2. Configuration Tab
Use this tab to configure the license server.

- IP: Shows the IP address of the network adapter selected in (2).
- NIC ID: List of the network adapter IDs used to fix licenses.
- Port No.: Shows the port number used for communication. You can edit the value to set a new port number.
- Password: Allows setting the password requested when authenticating a client. It is usually not required when operating over a local network. If you wish the server to request a password when a client connects to it, you can define that password here (up to 16 characters long).
-
Reset licenses periodically checkbox: Periodically reset licenses that have not communicated for a certain period of time.
- Check every day at: Set the time of day at which licenses are checked and reset.
- Reset licenses unused for more than: Set the amount of time without communication after which licenses can be reset.
The default setting is to reset licenses that have not communicated for more than 24 hours every day at midnight.
Warning
This function is intended for use in environments where the application cannot be closed normally and therefore licenses cannot be returned. If a license is reset while in use, watermarks may appear on images.
-
Apply button: Applies the changes made to the settings. If changes were made to items 2, 3, 4 or 5 above, the new settings will take effect after clicking this button.