P_BlurPath
 |
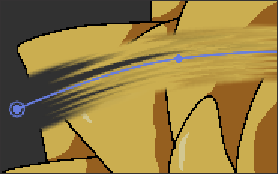 |
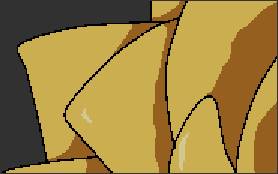
| Before | After applying BlurPath |
This effect blurs along paths.
By using the [Trails] function, you can create effects that look like something was pulled along a path or create the look of motion blur seen in drawings.
Parameters Reference
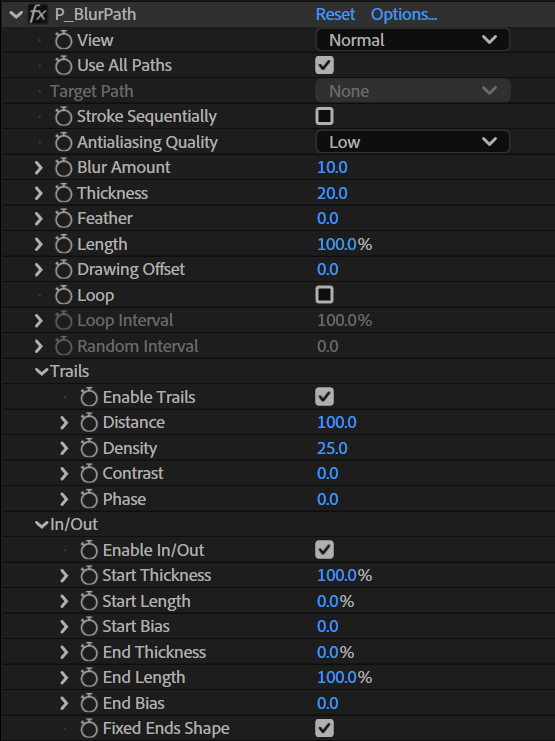
View
Select how the effect is displayed.
Normal
Show the source image and the effect simultaneously.
Extract
Show only the areas where the effect is applied.
Stroke
Display the blurs as single-color strokes.
This is effective for checking the shapes created by [In/Out] or for creating animations using [Drawing Offset].
Use All Paths
Check this box to draw blur strokes for all paths on the layer.
Uncheck it to draw a blur stroke only for the path specified by [Target Path].
Target Path
Select the path to apply the effect to. This is only available when [Use All Paths] is off.
Stroke Sequentially
Check this box to treat multiple paths as a single stroke. This is only available when [Use All Paths] is on.
Antialiasing Quality
Set the quality of the antialiasing processing.
None
Don't perform antialiasing processing.
Low
Perform antialiasing with a low processing load using post-effects.
High
Perform antialiasing processing using oversampling.
The processing load is high, but you can get beautiful drawing results.
Blur Amount
Set the amount of blur. Setting a large value will give an effect that looks like it flows along the paths.
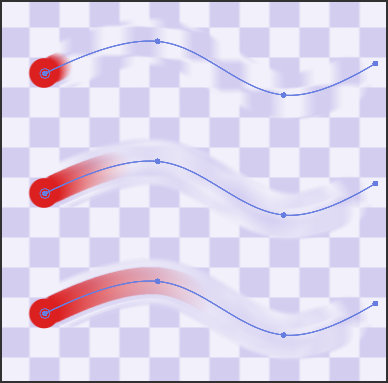 |
| Variation based on Blur Amount |
Thickness
Set the thickness of the strokes.
Feather
Set the width of the blur for the strokes.
Length
Set the length of the strokes. The length is specified as a percentage of the path length.
Drawing Offset
Set the start position for drawing strokes on the paths. Animating the value from [0] to [100] will move along the whole length of the path from beginning to end.
Loop
Check this box to make the strokes loop over the paths.
When increasing [Drawing Offset], strokes that extend beyond the end of a path will appear at the start of it.
Loop Interval
When a stroke loops, set the space between loops. This is only available when [Loop] is on.
Random Interval
Randomize the loop interval for the strokes.
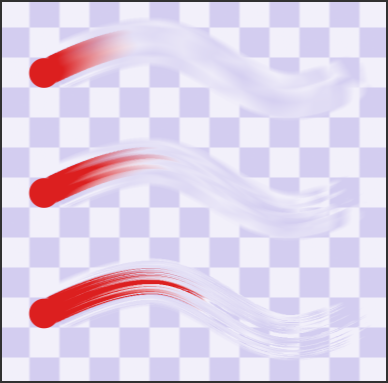
Trails
This function creates an effect of dragging pixels like random streaks along the strokes.
 |
| Trails function |
Enable Trails
Check this box to enable the settings in [Trails].
Distance
Set the moving distance of the pixels.
Density
Set the density of pixels dragged randomly.
Contrast
Accentuate the change in density of pixels dragged randomly.
Phase
Set the phase of pixels dragged randomly.
By animating this you can create the look of streaks moving randomly.
In/Out
This function adds an effect of pen pressure to the blur strokes.
 |
| Pen pressure conceptual diagram |
Enable In/Out
Check this box to enable the pen pressure effect on the strokes.
Start Thickness
Set the starting thickness of the strokes. At 100%, the thickness will be the same as the value set in [Thickness].
Start Length
Set the length of the increasing pressure effect at the start of the stroke. The length is specified as a percentage of the stroke length.
Start Bias
Adjust the shape of the stroke at the start. A higher value will create a swelling shape and a lower value will create a pointy concave shape.
End Thickness
Set the end thickness of the strokes. At 100%, the thickness will be the same as the value set in [Thickness].
End Length
Set the length of the decreasing pressure effect at the end of the stroke. The length is specified as a percentage of the stroke length.
End Bias
Adjust the shape of the stroke at the end. A higher value will create a swelling shape and a lower value will create a pointy concave shape.
Fixed Ends Shape
Check this box to fix the shape of the pressure effect at the start and end points of the path.