PencilMaterial
The PencilMaterial node is used to create materials that produce a hand-drawn or cel look.
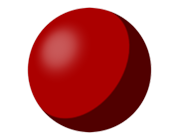
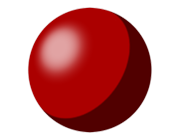
Highlight
Handles the specular reflection settings. Use these settings to create highlights such as those in hand-drawn art.
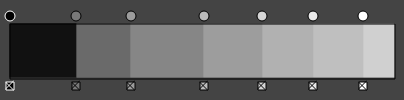
Blend Mode
Select how to blend the specular reflection light.
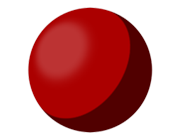
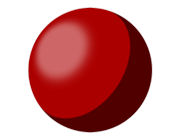
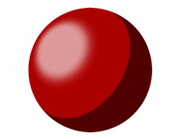
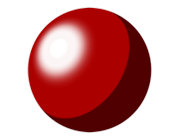
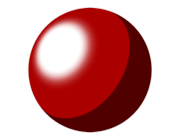
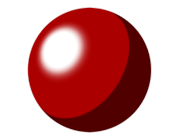
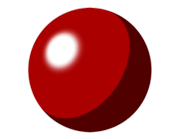
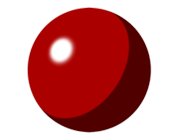
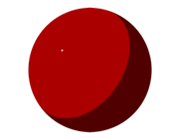
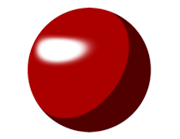
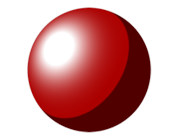
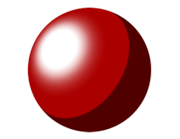
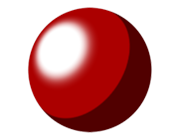
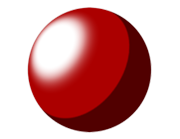
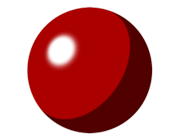
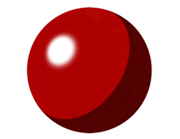
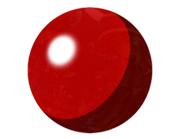
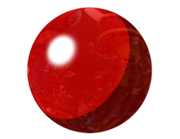
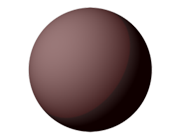
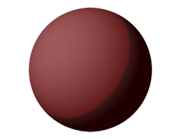
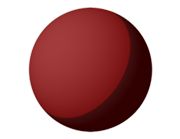
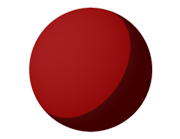
Blend Amount
Adjusts the intensity of the blending. A low value will produce transparent highlights.
 |
 |
 |
 |
 |
 |
|---|---|---|---|---|---|
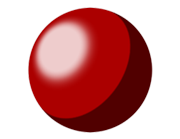
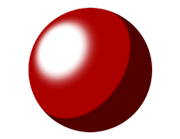
| Blend Amount: 0.0 Specular Level: 1 Glossiness: 0 |
Blend Amount: 0.2 Specular Level: 1 Glossiness: 0 |
Blend Amount: 0.4 Specular Level: 1 Glossiness: 0 |
Blend Amount: 0.6 Specular Level: 1 Glossiness: 0 |
Blend Amount: 0.8 Specular Level: 1 Glossiness: 0 |
Blend Amount: 1.0 Specular Level: 1 Glossiness: 0 |
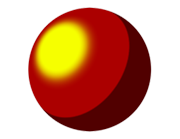
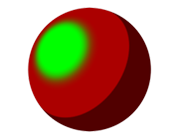
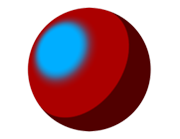
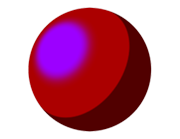
Highlight Color
Select the color of the specular reflection light.
 |
 |
 |
 |
 |
 |
|---|---|---|---|---|---|
| Using white | Using yellow | Using green | Using blue | Using purple | Using red |
Enable Color Map
Enable / disable the use of the color map.
Color Map
Select a map for the specular reflection.
Map Opacity
Adjust the opacity of the map. A low value will make the map transparent.
 |
 |
 |
 |
 |
 |
|---|---|---|---|---|---|
| Map Opacity: 0.0 (Using a checkered map) |
Map Opacity: 0.2 | Map Opacity: 0.4 | Map Opacity: 0.6 | Map Opacity: 0.8 | Map Opacity: 1.0 |
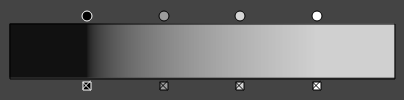
Specular Level
Adjust the intensity of the specular reflection light.
 |
 |
 |
 |
 |
 |
|---|---|---|---|---|---|
| Specular Level: 0.0 Glossiness: 0 | Specular Level: 0.2 Glossiness: 0 |
Specular Level: 0.4 Glossiness: 0 |
Specular Level: 0.6 Glossiness: 0 |
Specular Level: 0.8 Glossiness: 0 |
Specular Level: 1.0 Glossiness: 0 |
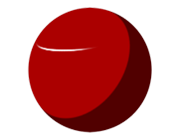
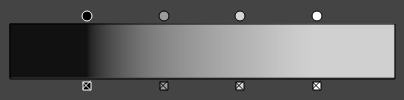
Glossiness
Adjust the spread of the specular reflection.
 |
 |
 |
 |
 |
 |
|---|---|---|---|---|---|
| Specular Level: 1 Glossiness: 0.0 |
Specular Level: 1 Glossiness: 0.2 |
Specular Level: 1 Glossiness: 0.4 |
Specular Level: 1 Glossiness: 0.6 |
Specular Level: 1 Glossiness: 0.8 |
Specular Level: 1 Glossiness: 1.0 |
Anisotropic
Set the thickness of the polish, influencing the size of the specular reflection.
 |
 |
 |
 |
 |
 |
|---|---|---|---|---|---|
| Specular Level: 1 Glossiness: 0 Anisotropic : 0.0 |
Specular Level: 1 Glossiness: 0 Anisotropic : 0.2 |
Specular Level: 1 Glossiness: 0 Anisotropic : 0.4 |
Specular Level: 1 Glossiness: 0 Anisotropic : 0.6 |
Specular Level: 1 Glossiness: 0 Anisotropic : 0.8 |
Specular Level: 1 Glossiness: 0 Anisotropic : 1.0 |
Orientation
Specify the direction of the anisotropic reflection.
 |
 |
 |
 |
 |
 |
Specular Level : 1 Glossiness : 0 Anisotropic : 0.9 Orientation: 0 |
Specular Level : 1 Glossiness : 0 Anisotropic : 0.9 Orientation: 30 |
Specular Level : 1 Glossiness : 0 Anisotropic : 0.9 Orientation: 60 |
Specular Level : 1 Glossiness : 0 Anisotropic : 0.9 Orientation: 90 |
Specular Level : 1 Glossiness : 0 Anisotropic : 0.9 Orientation: 120 |
Specular Level : 1 Glossiness : 0 Anisotropic : 0.9 Orientation: 150 |
|---|
Sharpness
Adjust the sharpness of the glossiness spread.
 |
 |
 |
 |
 |
 |
|---|---|---|---|---|---|
| Specular Level : 1 Glossiness : 0 Sharpness: 0.0 |
Specular Level : 1 Glossiness : 0 Sharpness: 0.2 |
Specular Level : 1 Glossiness : 0 Sharpness: 0.4 |
Specular Level : 1 Glossiness : 0 Sharpness: 0.6 |
Specular Level : 1 Glossiness : 0 Sharpness: 0.8 |
Specular Level : 1 Glossiness : 0 Sharpness: 1.0 |
Squash
Adjust how strongly the shape of the object influences the specular reflection.
 |
 |
 |
 |
 |
 |
|---|---|---|---|---|---|
| Specular Level : 1 Glossiness : 0 Squash: 0.0 |
Specular Level : 1 Glossiness : 0 Squash: 0.2 |
Specular Level : 1 Glossiness : 0 Squash: 0.4 |
Specular Level : 1 Glossiness : 0 Squash: 0.6 |
Specular Level : 1 Glossiness : 0 Squash: 0.8 |
Specular Level : 1 Glossiness : 0 Squash: 1.0 |
Diffraction Effect
Adjust how much highlights wrap around the shape of the geometry.
 |
 |
 |
 |
 |
 |
Specular Level : 1 Glossiness : 0 Diffraction Effect: 0.0 |
Specular Level : 1 Glossiness : 0 Diffraction Effect: 0.2 |
Specular Level : 1 Glossiness : 0 Diffraction Effect: 0.4 |
Specular Level : 1 Glossiness : 0 Diffraction Effect: 0.6 |
Specular Level : 1 Glossiness : 0 Diffraction Effect: 0.8 |
Specular Level : 1 Glossiness : 0 Diffraction Effect: 1.0 |
|---|
Range
Adjust the range of the diffraction effect.
 |
 |
 |
 |
 |
 |
|---|---|---|---|---|---|
| Specular Level : 1 Glossiness : 0 Diffraction Effect: 0.0 Range: -0.3 |
Specular Level : 1 Glossiness : 0 Diffraction Effect: 0.2 Range: -0.2 |
Specular Level : 1 Glossiness : 0 Diffraction Effect: 0.4 Range: -0.1 |
Specular Level : 1 Glossiness : 0 Diffraction Effect: 0.6 Range: 0.0 |
Specular Level : 1 Glossiness : 0 Diffraction Effect: 0.8 Range: 0.1 |
Specular Level : 1 Glossiness : 0 Diffraction Effect: 1.0 Range: 0.2 |
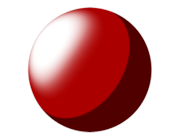
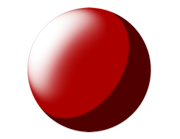
Bump
Use an image as a bump map to create a pseudo-roughness effect.
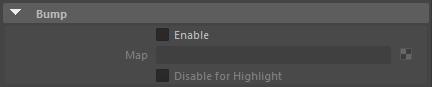
Enable
Enable / disable the bump effect.
Bump Map
Select a bump map.
 |
 |
 |
 |
 |
 |
|---|---|---|---|---|---|
| Bump Depth: 0.0 Disable for Highlight: Off (Using a noise map for the bump map) |
Bump Depth: 0.02 Disable for Highlight: Off |
Bump Depth: 0.04 Disable for Highlight: Off |
Bump Depth: 0.06 Disable for Highlight: Off |
Bump Depth: 0.08 Disable for Highlight: Off |
Bump Depth: 0.1 Disable for Highlight: Off |
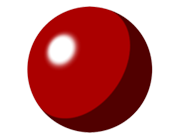
Disable for Highlight
Enable / disable the effect of the bump map on the highlight.
 |
 |
 |
 |
 |
 |
|---|---|---|---|---|---|
| Bump Depth: 0.0 Disable for Highlight: On (Using a noise map for the bump map) |
Bump Depth: 0.02 Disable for Highlight: On |
Bump Depth: 0.04 Disable for Highlight: On |
Bump Depth: 0.06 Disable for Highlight: On |
Bump Depth: 0.08 Disable for Highlight: On |
Bump Depth: 0.1 Disable for Highlight: On |
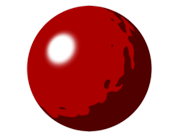
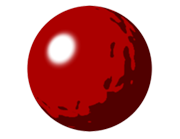
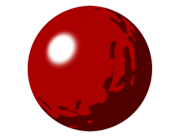
Reflection
Use Reflection to create reflections of the surrounding environment, like for metallic surfaces.
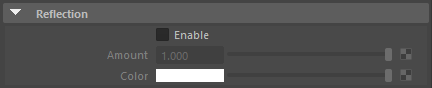
Enable
Enable / disable the reflection effect.
Amount
Adjust the intensity of the reflection effect.
Color
Select a color for the reflection. Use a map to create pseudo-reflections using environment mapping.
Turn on [Raytracing] in the Maya Software renderer's [Render Settings] / [Raytracing Quality] to compute realistic reflections.
 |
 |
 |
 |
 |
 |
|---|---|---|---|---|---|
| Amount: 0 (Using a map for the reflection) |
Amount: 0.2 | Amount: 0.4 | Amount: 0.6 | Amount: 0.8 | Amount: 1.0 |
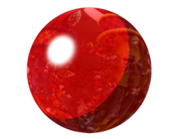
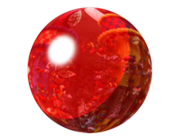
Transparency
Use transparency to create translucent looks.
![]()
Amount
Set the transparency level.
| Amount: 0.0 | Amount: 0.2 | Amount: 0.4 | Amount: 0.6 | Amount: 0.8 | Amount: 1.0 |
Gradation
This section is used to set the material's gradation settings. The areas between colors in PencilMaterial are called [Zones]. Colors and maps are applied to each zone individually.
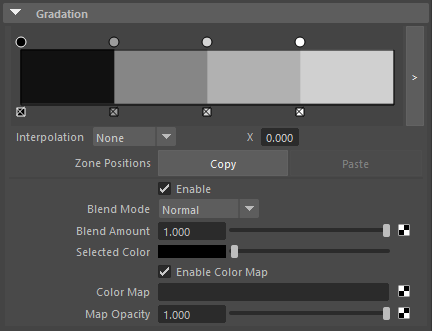
Gradation Bar
Gradation colors can be added and deleted with the Gradation Bar.
Its basic operation is the same as for Maya's [Ramp Shader]. Click on the bar to add a zone at that location.
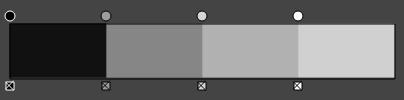 |
| 4 Zones |
 |
| 7 Zones |
Interpolation
Set the type of interpolation. The gradation bar provides an approximation of the interpolation. It can be slightly different from the interpolation used in the rendered image.
 |
| Interpolation: None |
 |
| Interpolation: Linear |
 |
| Interpolation: Smooth |
 |
| Interpolation: Spline |
X
Set the horizontal coordinate of the zone.
Copy and Paste
Copy / Paste the zone coordinates. Use this to copy the values between materials.
Enable
Enable / disable the zone. When disabled, the [Basic Material] is drawn instead.
Blend Mode
Select the blend mode for the zone. Used to blend the zone color with the [Basic Material] color.
Blend Amount
Adjust the intensity of the blending. Use a low value to make the zone transparent and mix its color with the [Basic Material].
 |
 |
 |
 |
 |
 |
|---|---|---|---|---|---|
| Blend Amount: 0.0 | Blend Amount: 0.2 | Blend Amount: 0.4 | Blend Amount: 0.6 | Blend Amount: 0.8 | Blend Amount: 1.0 |
Selected Color
Set the zone color.
 |
 |
 |
 |
 |
 |
|---|---|---|---|---|---|
| Using white | Using yellow | Using green | Using blue | Using purple | Using red |
Enable Color Map
Enable / disable the use of the color map.
Color Map
Apply a map to the zone color.
Map Opacity
Adjust the opacity of the map applied to the Zone. A lower value makes the map more transparent.
 |
 |
 |
 |
 |
 |
|---|---|---|---|---|---|
| Map Opacity : 0.0 (Using a checkered map) |
Map Opacity : 0.2 | Map Opacity : 0.4 | Map Opacity : 0.6 | Map Opacity : 0.8 | Map Opacity : 1.0 |
Gradation Offset Map
This section is used to apply a gradation offset map.
Enable
Enable / disable the gradation offset map.
Map
Select a map to use for the gradation offset.
Add offset effects to gradation computation based on a map. This can be used to make it easier for dark or light colors in a gradation to come out. Unlike setting a map to a Zone, it produces natural looking gradations influenced by the light.
Amount
Adjust the intensity of the Gradation Offset Map.
 |
 |
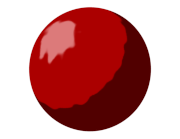 |
 |
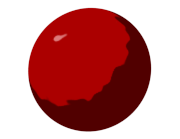 |
 |
|---|---|---|---|---|---|
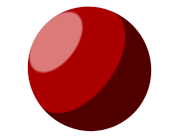
| Amount: 0.0 (Using a noise map) |
Amount: 0.2 | Amount: 0.4 | Amount: 0.6 | Amount: 0.8 | Amount: 1.0 |
Output Offset
Define the value to be used as the origin for the map output.
Basic Material
Define the basic material underlying the Pencil+ 4 material in this section.

Material
Set the basic material. Click the map button to specify a shader you wish to use.
Pencil+ 4 Material has a layered structure similar to Maya's [Layered Shader]. This makes it possible to blend the flat shading of Pencil+ 4 Materials with standard shading.
Line Related Functions
Section related to Pencil+ 4 Lines.

Line Functions
Functionality related to Pencil+ 4 Lines can be applied on a material basis.
Click the button to create a new PencilLineFunctions node.
User Defined
User defined data can be stored here. Use this to manage data. These settings have no effect on rendering.

User Defined
Set your user defined data here.
Label
Set the label color.
Comment
You can input text here.